Strategy Initialization
Before you can access the strategy canvas and begin building your automated logic, you must complete the Strategy Initialization process. This ensures that your system has the correct execution environment, target instrument, and data frequency.
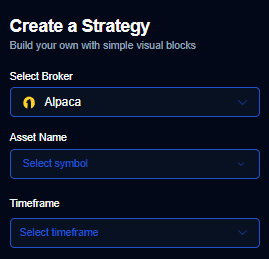
Core Configuration Requirements
To proceed, you must finalize three primary selections:
1. Broker Selection
The Broker Selection defines the execution destination for your automated orders. You must choose an account that is already connected via API.
- Options: Choose from supported brokers such as Alpaca, Webull, or Public.
- Impact: This determines which account will hold the positions and where all trade execution will take place.
2. Asset Selection
The Asset Selection identifies the specific financial instrument your strategy will monitor.
- Examples: You can select symbols like Nvidia (NVDA), Tesla (TSLA), Microsoft (MSFT), or Google (GOOGL).
- Impact: All indicator calculations and price logic on the canvas will be derived from this specific asset’s data feed.
3. Timeframe Selection
The Timeframe Selection establishes the “pulse” of your strategy.
- Common Intervals: Select from periods such as 3 minutes, 5 minutes, or 15 minutes.
- Impact: This determines the frequency of market data updates. Your logic conditions (e.g., EMA crossovers or RSI thresholds) are evaluated once at the close of every candle for the selected timeframe.
Accessing the Canvas
Once you have finalized your Broker, Asset, and Timeframe:
- Review your selections to ensure they align with your trading goals.
- Click the “Build Strategy” button.
- The system will generate your workspace and redirect you to the Strategy Canvas, where you can begin dragging and dropping logic blocks.
Tip: Ensure your broker account is properly funded and API permissions are active before deploying a strategy to a live environment.